Groundworks, drama and trauma
- Mar 24, 2022
- 6 min read
Updated: Sep 9, 2024
humblebee hive - retrofit #4

Last week was less fun as it started with a trip to A&E for one of the site workers. Our bricklayer Tim had been keen to get going with backfilling the trench because the scaffolders wanted level ground before turning up, but he unexpectedly tested the sharpness of a new saw, not only on the ply shuttering but also - it turned out - on three tendons of his left hand.
His teammates sprung immediately into action, bandaged him up and drove him to the nearest (timewise, considering traffic conditions) hospital. This all happened before the Monday morning school run. Chris stayed with him through triage and then went back for him once he'd been seen and given the paperwork. Mark drove T to the hospital closest to his home and Liam was insured to drive his van back.


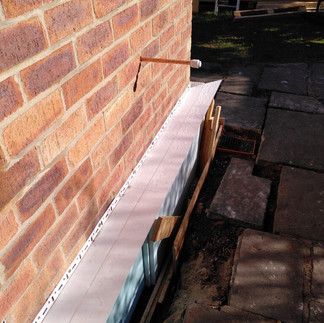
Something like this really does shake the team, stills the mood and makes us stop and think. While we pondered the "what-ifs" and "if-onlys", work carried on in subdued diligence, and we were joined by Brian on the Wednesday. The XPS plinth around the base of the insulation was completed - with cutouts for the floor vents - and the French drain they'd spent two weeks digging up all the way around the perimeter of the house got backfilled with shiny new gravel.
The trench - only 200 x 200 because our house could just as well be on stilts - threw up some surprises of its own, including the fact that, unbeknownst to us, our kitchen sink, washing machine and dishwasher were draining straight into the ground beneath the house: the open drain pot had cracked in two, and the pipe that was meant to channel waste to the combined manhole was practically flat and had completely silted up. Poor Liam didn't have the constitution for the curdled fat ball he'd discovered, so imagine how he reacted when he saw T's open wound! (I'll be the first to admit I wouldn't have been able to stomach either situation myself.)


It turns out Richard had been a plumber in a past life, so he wasn't getting off lightly with this job - plenty of small plumbing adjustments required, like the outdoor tap and overflows that needed extending.
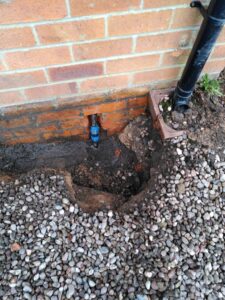
A couple of days into the works, I was conducting a householder interview for People Powered Retrofit, when suddenly, out of my office window, a fountain had sprung, and a bewildered L was getting soaked with water. He'd hit the incoming mains with his shovel. Poor L: you would never have thought the incomer was in that location seeing as all the other services were round the side of the house... And you'll never guess what the next question on the householder questionnaire was: "have you ever experienced leaks or flooding?" - LOL.
It wasn't raining... :-)
T had found the main isolation valve in the public manhole but it was too stiff to shut off. As luck would have it, our knight-in-shining-armour came in the shape of a groundworks contractor, Karl, who was working just up the road and gave our team a clamp to keep the leak under control until he could come and fix it using fittings he had in his van. I was going to take a photo but Erol was quick to point out there was rather more of K on show than we'd bargained for, so we've spared you the detail!

Fixed water mains connection
Both discoveries confirmed welcome news in a way: we certainly found out the soil drained well and we were unlikely suffer a flood any time soon!
We would definitely recommend finding out about existing services if you can. There was very little detail with our deeds and buyers' info, but I found this website which is free to register and gives some idea of where things might be routed: LinesearchBeforeUdig. It only confirmed the water services in the road in our case, but did show electric cabling roughly where we'd anticipated it. Our gas comes across from the garage at E's woolly hat height, inconveniently you might say, but at least it's obvious. One thing I had managed to do prior to work starting was to contact Openreach - who manage all BT's infrastructure - about an overhead wire that was attached to our eaves, and they promptly sent someone out at no cost.
External Wall Insulation
Confession time: when we saw that this house was on the market, I was in the middle of the Passivhaus Certified Designer course, where in the exam you're asked to "design a house". As you can imagine, an engineer designing a house to optimise form factor is a very rectangular affair, with wet rooms and services stacked vertically, and short runs for ventilation, so the layout ends up being simple rooms arranged around a central hall and landing. Well, that's basically what I saw in this house: it didn't matter that it had no period features, it didn't matter that it had a tired kitchen, not a new one, it didn't matter that there were no ensuites, or even the potential for any. As much as we'd have loved all those things, I saw the floor plan on my train journey and said to M "we can EnerPHit this!". Given the location - perfect for our family, with a "ginnel" to the primary school that the children attended, and 10-15 min walk to virtually anywhere we'd want to be, including the station and the high school - the price tag was just about manageable, if a little scary given I'd just handed in my notice, with no real plan.
Anyway, after more than 3 years in the planning, the EWI was ordered just in time for our works, after a bit of a scramble: the 140mm Pavatex woodfibre system R had in mind from one supplier was being sucked away by one large commercial job (14 articulated lorries-full, I later found out!) so we had a last minute change of spec. And Mike Wye came to the rescue with stock items Steico Therm Dry 80mm flat faced + 100mm Protect Dry tongue & groove. As it turned out, I'd made a mistake in my PHPP model so the extra thickness was welcome, and still do-able within our eaves overhang, but do always check thermal conductivities of each board type (in this case 0.038 W/mK and 0.040 W/mK respectively)!


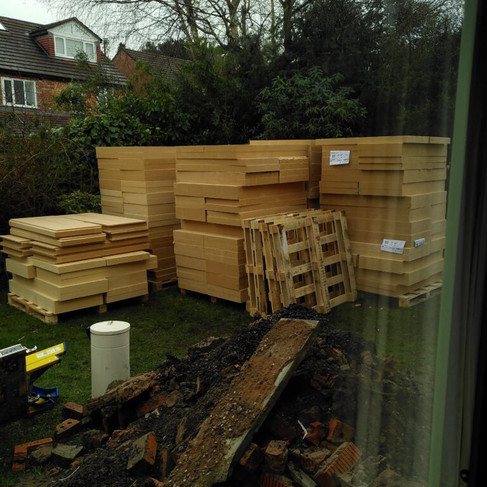
Once the insulation was delivered, our garden turned into a regular builders' yard, with boards stacked high, and sacks of SecilTek E-Cork adhesive taking up some space in the garage - the team had helpfully tidied up in there, meaning we could get the bikes out easily too. The pallet wood and other packaging was used imaginatively, to weigh down some waterproof packaging, as packing inside for the window reveals, as workbench material and for temporary steps.
A plastic "skirt" is attached to the brick above the XPS plinth and at the base of the woodfibre. The 80mm layer is attached directly to the masonry with the adhesive, and the 100mm layer is overlayed and fixed through to the brick with plastic pins/dowels. There was no way I could do joinery but I did fancy having a go at putting the insulation boards up so here's me making a pig's ear of applying the mortar (thanks Lynne for the filming!) and the finished result (ahem, after a bit of touching up by Liam). They are dense batts but still relatively lightweight. L told me it's the corners that are tricky - especially the T&G boards - and gaps should either be non-existent, or big enough to fill with foam.


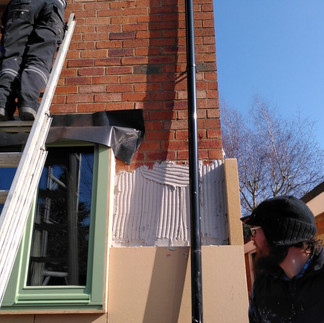


Of course, nothing has actually turned out to be square is this house - pretty shoddy late 1970s construction, and practically as old as us. But team EWI did the best they could and made good progress until we were hit with a scaffold delay. I've included some progress photos in this post and will talk about final cladding in a later instalment: but just to keep you interested, the plan is for oyster white render on most elevations, with some locally sourced timber for the ground floor at the front to break up the boxy look (a bit).


Update: Tim had surgery on his hand last week and the cast was coming off yesterday. He's the kind of person who blames only himself and feels bad for holding everyone up, and he'd been so sweet complimenting my experimental tea loaf (Thursday night has turned into baking night - with a new oven it would have been rude not to test it!). He's certainly been missed by us all but needs a few weeks' recovery time and we hope to see him back before the end of the job.
Costs #4
Final costs have yet to be finalised, due to the "imprevisti" (Italian for unforeseen events), but the EWI installation is estimated to cost:
External Wall Insulation System (of which labour is approx. £12,000): £26,100.
Total retrofit to date: £52,533 (approx. £478 /m2 GIFA).
Wall U-value target: 0.153 W/m2K


Comments