Seal tight, Ventilate right
- May 8, 2022
- 7 min read
Updated: Sep 9, 2024
humblebee hive - retrofit #7

It's the retrofit mantra. And we did notice how quickly it got stuffy once the windows were in and the EWI was all but sealed. We were still getting chilly inside, in part because in order to have fresh air we had to have the windows open, while the rest of the work was being carried out.
Because we were meant to start in November but got delayed, I thought I could maybe bring forward the MVHR (Mechanical Ventilation with Heat Recovery) installation and have it done before the spring. But I struggled to find installers and it turned out that the person I had in mind, Erol (whom I'd met at a Carbon Coop matchmaking workshop before lockdown), had joined forces with Richard as a member of his Retrofit Hub, so really it made sense to do it as part of this current phase.


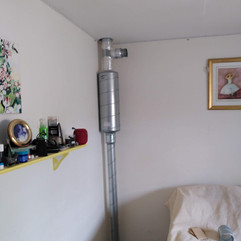


MVHR Installation snaps
At least I had some time to fit in the calculations, size the ducts and valves - circular adjustable grilles that either push air into a room or suck it out - work out a sensible route with very little floor to ceiling height and research possible high-efficiency units (it had to fit through the loft hatch). Needless to say we ummed and aahed about most things.
Fast forward and today we part-commissioned, and I have to say I was pretty pleased: overall flowrates and pressures were fine (extract fan speed had to be adjusted up, but apparently that's not uncommon as they're not always set the same by default), and with all the grilles open we were getting roughly the right proportions in or out of each room. Patrick (from Heat, Space and Light) was happy with the installation which is, of course, very neat (team Windows had turned into team MVHR, performing another form of joinery).
He'd not come across the Adroit DV96 before, a Passivhaus-certified British-made unit from Airflow Developments, which we paid a small fortune for (VAT really does add a massive chunk, doesn't it? That was a bit of a shock). But P liked the robust looking filter section and the LCD controller with a tidy little graphic showing outside and supply air temperatures. It also has built-in CO2 and RH sensors, and 4 modes: "away" (low), "at home" (medium), "boost" (high), and you can set a "open fire" mode if you need to (supplies more air than it extracts). An automatic 100% bypass is also a key feature.
There was a kind of anti-climax - not to mention heart-stop - when P switched on the unit and nothing happened. Daz the electrician had come round to connect everything very efficiently the week before, a day that I was out, so I hadn't dared try to switch anything on (this included the ethernet connection - and so I guess the hub is staying in our bedroom for the foreseeable then... :-D). Therefore I didn't even know if any of it was working.
But in fact, the LCD controller* - located in the landing cupboard - had been activated, lit up and was ready to be set up.
Brief interlude: the roof
Had woken up before dawn that day to the sound of dripping: delays to the roof works (a number of factors) meant we'd been left with just the felt for a good few weeks, but a heavy downpour (and lapped up sections of felt) meant that water had found its way down some areas of the cavity wall through a couple of plywood boxes. Even though forecast was dry - local farmers had obviously been praying too effectively - we should have known: it was a Bank Holiday in the Northwest of England after all...
I had also been chasing cheeky jackdaws off the roof all weekend as they had pecked merrily at the felt, making visible holes and tears. They had the gall to keep coming back, and even perch on scaffold bars while the workers were up there repairing the damage! As Chris said, they have the advantage of being able to fly up there and fly off at will.
So water had also trickled down the rafters and soaked the woodfibre layer, which then came through the wafer-thin plasterboard above the window in our bedroom (signs there of historic damage, so there had probably been a leak and problem lintel in that location before).
And to top it, Andy had just started a new roofing job that day so wasn't going to be available for another week at least (can I cry at this point?). Time to extend the scaffold again, and delay the solar PV company once more - after all the "we need you on site next week" talk... (and so much for "and while we're up there").
Another night of rain, and although the cedar fascias and lovely Lindab galv guttering were up, it obviously wasn't enough because we were still getting drips in our bedroom, and the team went and got some Visqueen sheets to protect the roof further. The work continues...
But back to the MVHR...
Why is it in the (cold) loft? It's probably one of the first questions anyone asks me: "couldn't we put the unit in the loft?". In typical doctor's "do as I say not as I do" fashion, I normally advise against it. This is because the loss of heat exchange efficiency due to the supply and extract runs being in a cold space is significant: the ducts lose heat to their surroundings (a drop of nearly 10 points in our case), however much you insulate (2-3% uplift with each 25mm layer of insulation, with diminishing returns). And when you've invested so much in the efficiency of the unit, it's a shame to be losing so much. But space-wise, we really had no other choice.
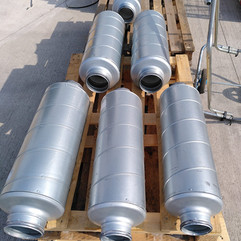
Radial or branched?
P would normally design radial systems and you can read more about why here. In an "octopus" configuration, main ducts to / from the unit connect to plenum boxes and then individual semi-rigid plastic ducts to each room, all small diameter. It has the advantage of easy installation - only a stanley knife is needed, connections are push-fit, and you can avoid crosstalk attenuators.
At first I'd envisaged running in ceiling bulkheads and my choice was one, originally, of materials - both type and quantity. I wasn't comfortable with that amount of plastic or limited longevity.
The decision to run a fair amount of ductwork in the attic space was a rather late one though. Had that been my starting point, the idea we could have mainly distributed within the loft insulation layers and possibly had better locations for the bedroom supply grilles, not to mention ease of installation may have just swayed me towards a radial solution.
I do like the galvanised steel: it certainly feels like the sturdier choice, but it's good to keep an open mind and evaluate each project on its own merits, including materials + installation costs (I'd got an exceptional deal on materials, but labour-time cost was inching towards the upper end).
Adroit LCD controller "grinning smiley"
Costs
Adroit DV96 £2,297, LCD controller £211, Boost switch £20, Spare filters £48.72, add VAT, Total £3,092.06 incl. VAT.
Lindab Ductwork, valves and components £1,319.35 incl. VAT.
Kitchen extract grille (with replacement filter) £97.80, Intake/Exhaust combined grille £149.70 incl. VAT
Installation, £4,500 (includes builderswork holes, excludes making good / boxin in).
Commissioning, £475 +£125 (return visit) + VAT, £720 incl. VAT.
Sub-total MVHR, £9,880 incl. VAT.
Total Retrofit to date, £63,021 (£573/m2 GIFA).
Note a Zehnder CA200 can be purchased for £1,484 + VAT, but expect to pay approx. £500 (ex VAT) for design.
My advice? We do this for our offices and commercial spaces (provide good indoor air quality) - why wouldn't we do this in our homes. And with the pandemic and more working from home, those are even more reasons to invest in these systems. So I'd say just do it, because you're worth it! (and please don't sue, big corporates whose tag lines I've just plagiarised).
A rather long post - I was going to touch on airtightness but it merits a whole article (spoiler alert: we had a royal visit - the guru of air testing himself - and by the way, you don't need an airtight building to install an MVHR system, despite what some might say).
*To be honest, I'm not sure why the controller is sold as an extra but this did make commissioning straightforward as I couldn't see any "on board" controls that would have allowed setting the fan speeds and modes. The alternative, according to the manual is to connect to the Airflow Cloud with a computer and use the ethernet/WiFi connection. In any case, I definitely recommend ordering it, along with a boost switch (or two) for wet rooms. We've placed just the one between kitchen and WC as a bit of saving.
**I heard this week that Tethera has been formally certified! Our first Passivhaus, whoop whoop! As an aside, we'd spec'd the Systemair unit for R's job, because of dimension constraints, but you need to unscrew the panel to change the filters, and commissioning wasn't straightforward, so I've steered clear since.


Comments